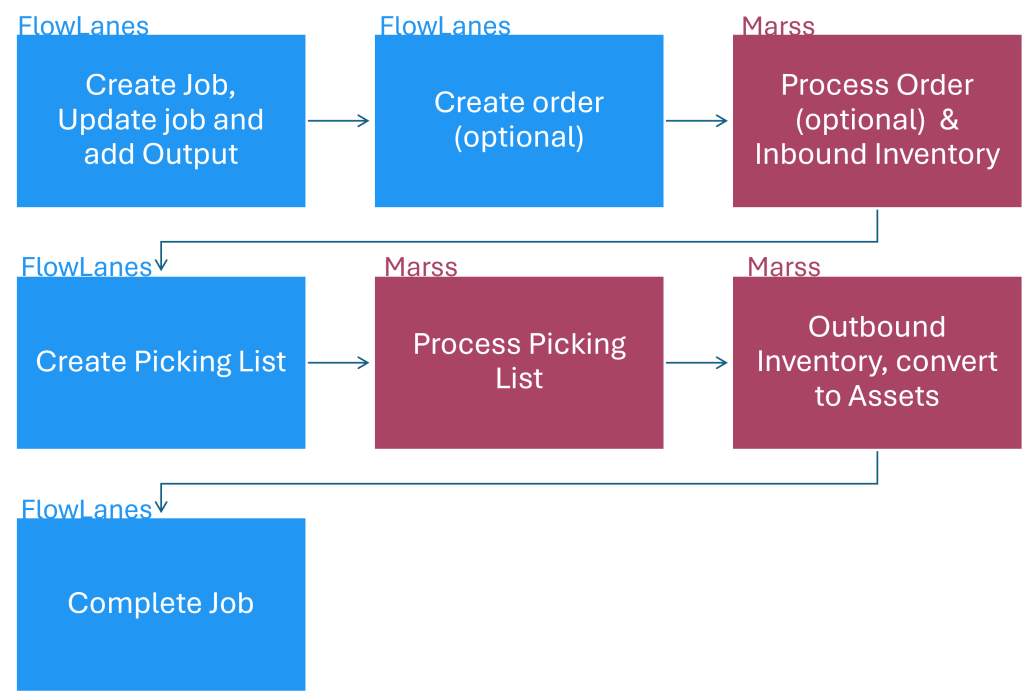
To manage inventory with serial numbers – store and track the items in Marss, then link them to jobs in FlowLanes. These jobs can seamlessly flow into invoices, ensuring accurate inventory management and transaction tracking.
Marss (See Marss) allow users to assign serial numbers to inventory items, ensuring each item has a unique identifier. This enables precise inventory tracking, allowing users to inbound, pick, and outbound specific items with ease. During the outbound process, inventory can be converted into assets, with serial numbers designated as their unique identifiers in the form of asset barcodes.
FlowLanes allows users to add a job, assign inventory to it, and generate an order to for new stock, and create picking list for retrieval from the store. Once the stock is picked, its serial numbers are scanned and recorded, ensuring they are accurately reflected on the job. Invoicing can be initiated upon job completion.
Follow the steps below to Inbound inventory with serial numbers on Marss (this can be done with or without purchase orders), link the inventory and create the Picking list on FlowLanes, Pick the inventory on Marss, View the picked serial numbers on Marss or FlowLanes, Outbound the inventory on Marss and convert the inventory to assets. Once the job is complete, invoicing can be generated on FlowLanes.
Setup
Before you can follow the steps below, ensure you have setup the following on your accounts:
- Connect your Marss and FlowLanes accounts: See Link FlowLanes to Marss
- Download the Marss mobile app from the Google Playstore
Marss
- Add Asset & Inventory Categories, Locations and Inventory (See the Marss Knowledge Base to setup).
- Set the Asset Tracking Category (Enter the asset category barcode the inventory should set to when converting from inventory to assets) on the individual inventory items (See Update Inventory Details to set the tracking categories).
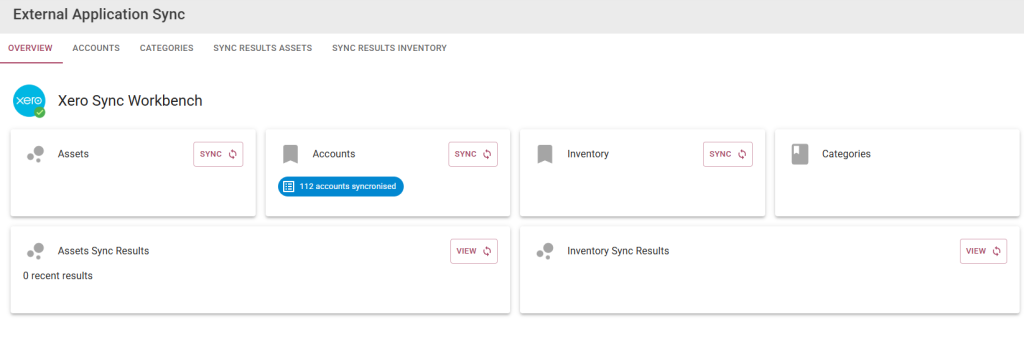
- Connect to Xero and Synchronise accounts and set the default depreciation accounts (if inventory with serials will be converted to assets on outbound, the assets can be synchronised to Xero on the External Application Sync page in Account) – See External Sync, this is optional
FlowLanes
- Setup Organisations and Job Categories on FlowLanes (See Add Organisation and Setup Job Categories).
- Syncrhonise Inventory from Marss, see Sync your Inventory
- Optional: Connect your Xero account: Synchronise Suppliers, Clients, and Account Codes (if not connecting to Xero, then simply add these on FlowLanes, see Manage Suppliers, Setup Clients and Access Xero)
Step 1 – Create the job on FlowLanes
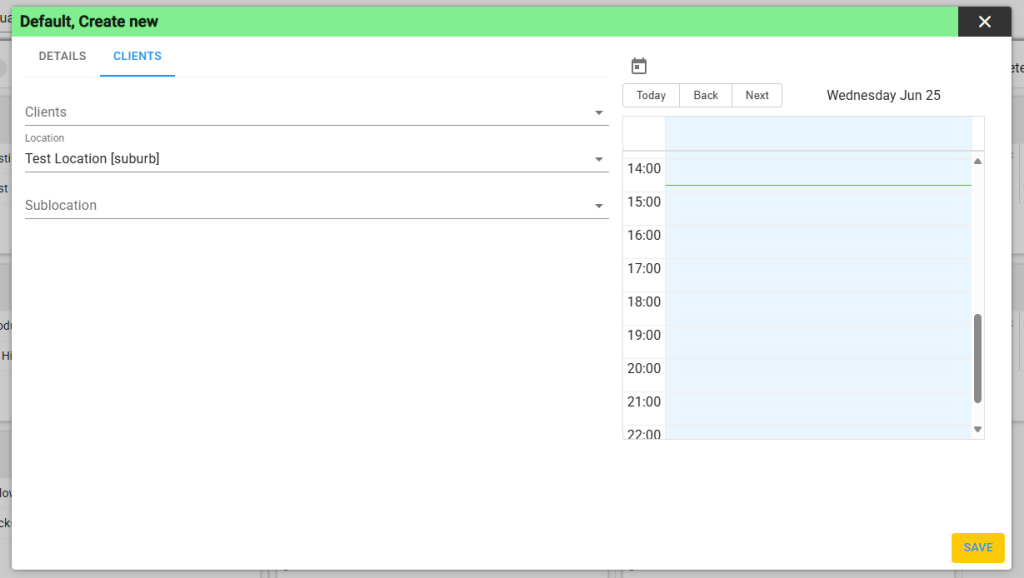
Create the job on FlowLanes – for more information regarding adding jobs see Adding Jobs
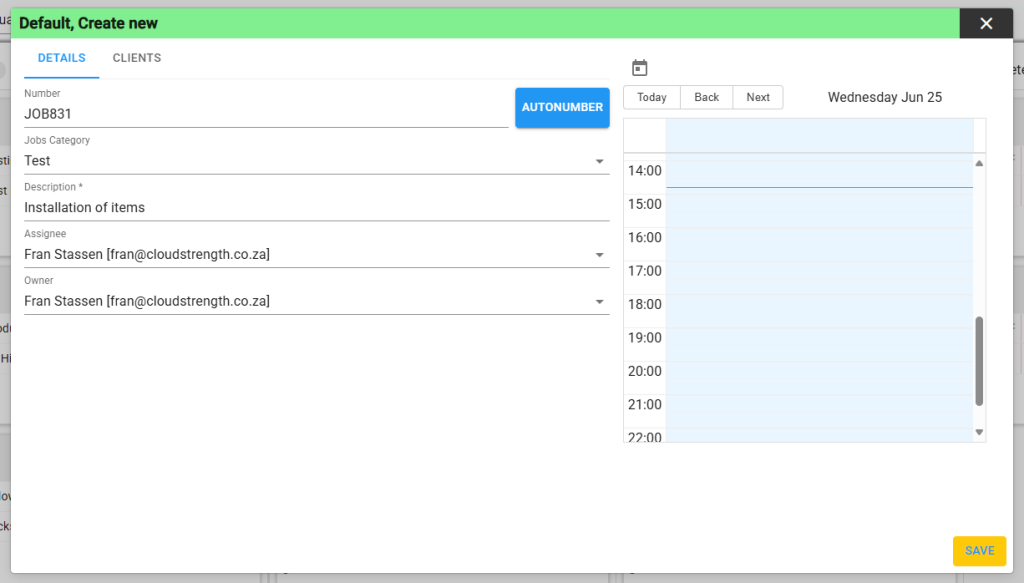
- Select the Add button in the top right corner
- The following details are required to setup a job: Job Number (autonumber can be used), job category, description, assignee and owner users, client and/or location. Optional – set the date and time of the job.
Step 2 – Update the job on FlowLanes
- Hover over the job card and select the pencil icon on the job to open the job
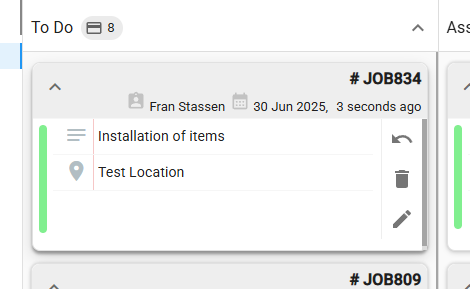
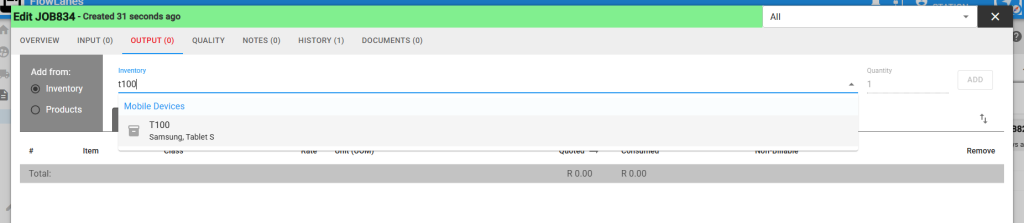
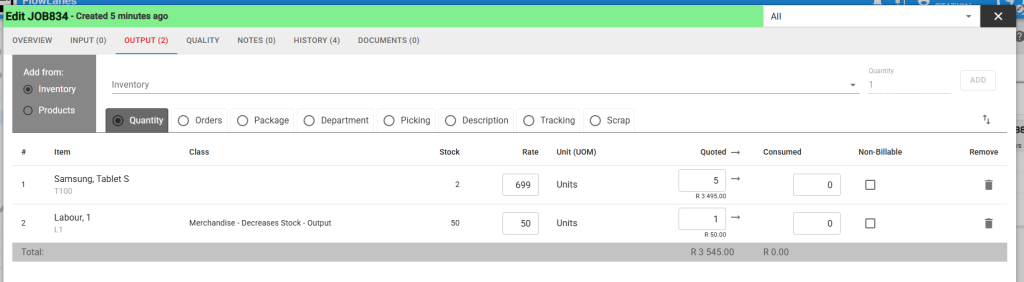
- Select the Output tab from the top
- Search for your inventory and services like labour (if required for billing)
- Notice the current quantity of stock (Marss inventory stock level)
- Update the rate if necessary (setup default rates on Admin/Inventory)
- Update the quoted quantity
- Once completed, select the save or save then close button
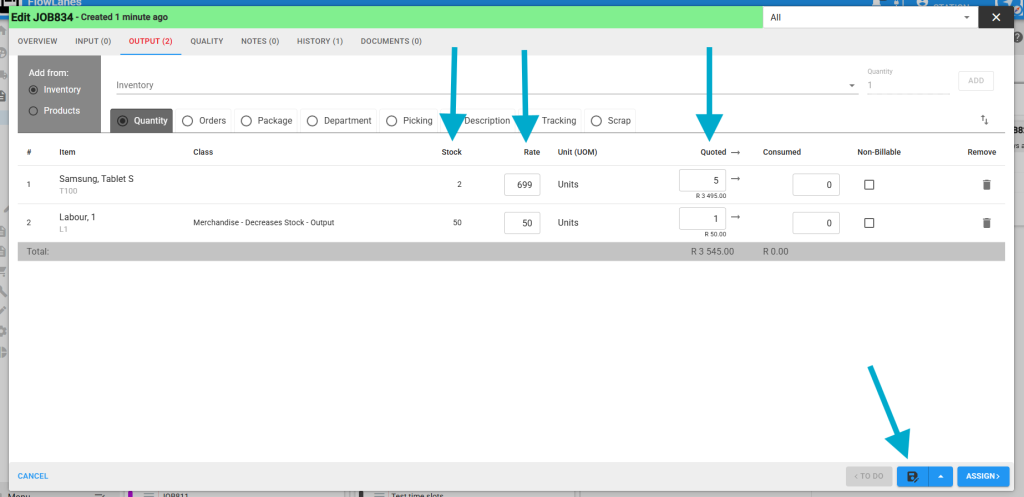
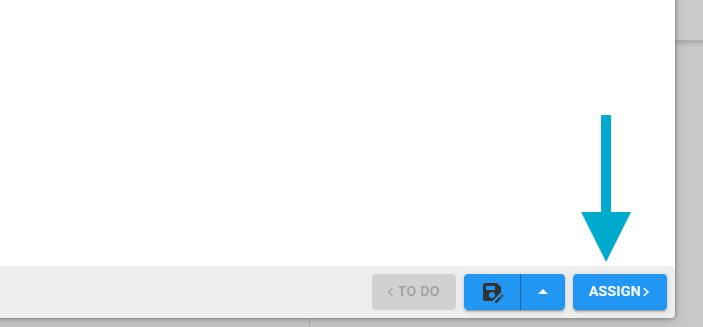
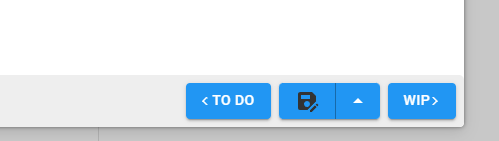
Now you can move your job to the next lane, either select the Assign button on the job when the job is open, or click and drag the job card to the next lane. The job is now ready for review.
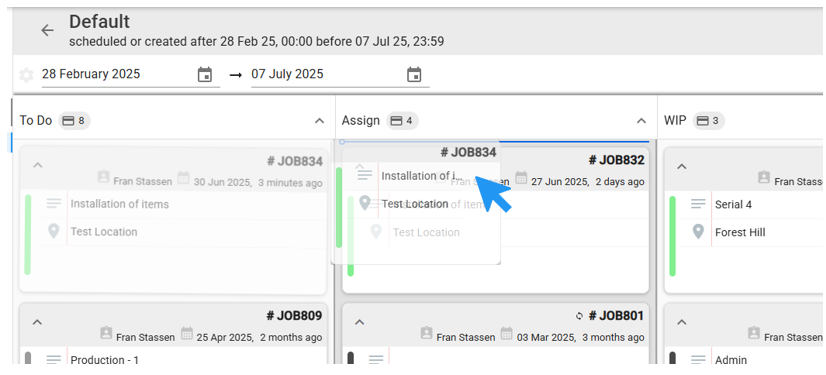
For more details on job management, see Jobs
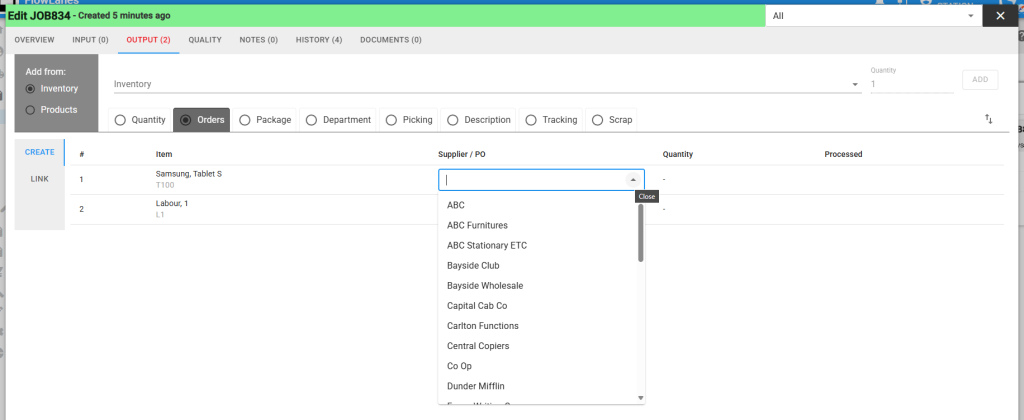
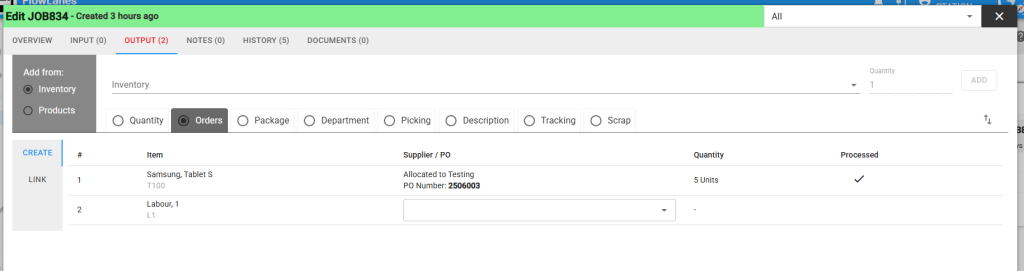
Step 3 – Optional – Order Stock from the job on FlowLanes
If your inventory stock level is low (view stock levels next to the inventory name on the Output tab), an order can be created directly from the job. Open the job again by hovering over the job card and selecting the pencil icon.
- Select the Output tab, then update the quantity you would like to order in the quoted column
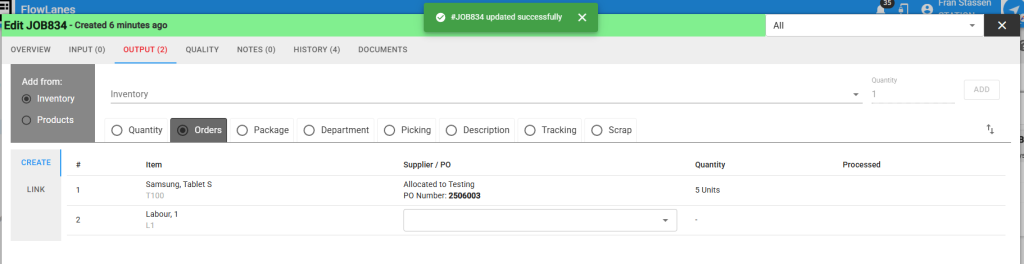
- Select the Orders toggle on the Output tab, confirm the Supplier and save the job, the PO number will be displayed on the Orders tab
Step 3 – Update PO and sync to Marss (only required if step 2 is completed)
To view or manage your order on FlowLanes navigate to the Purchase Orders page in the financial menu, the latest PO will be displayed at the top:
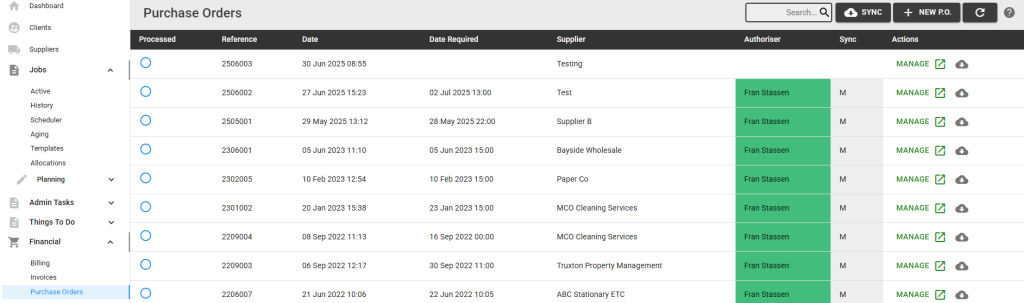
- Select the Manage button for the order line and update the date required
- Select the organisation (the organisation ordering the goods)
- Select the Save button to update the order
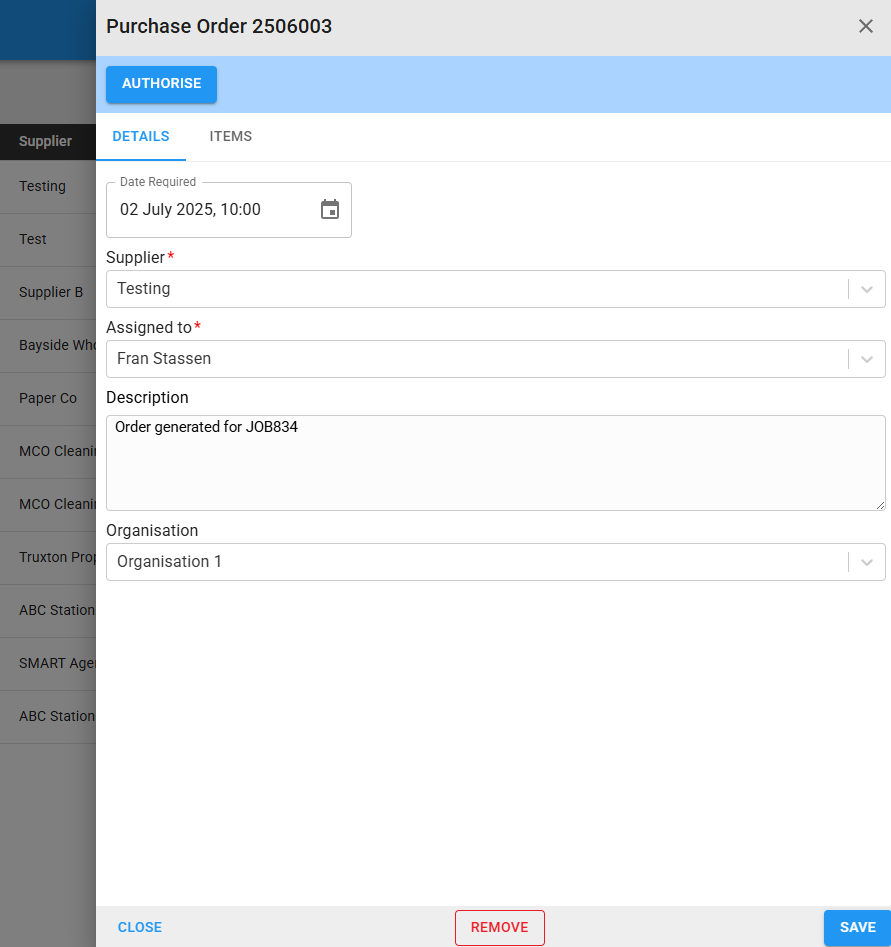
- Reopen the order and select authorise
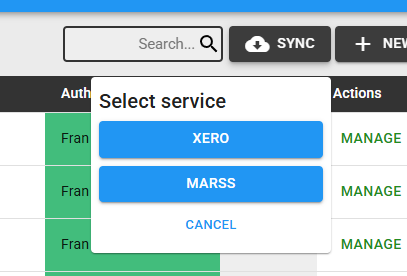
- Select the sync button in the top right corner and select the Marss option
- If required, the order can also be synchronised to Xero by selecting the Xero button
To view and process your order on Marss navigate to the Logistics/Orders page (if you can’t see your orders, adjust the date filters):

Step 4 – Inbound new inventory stock
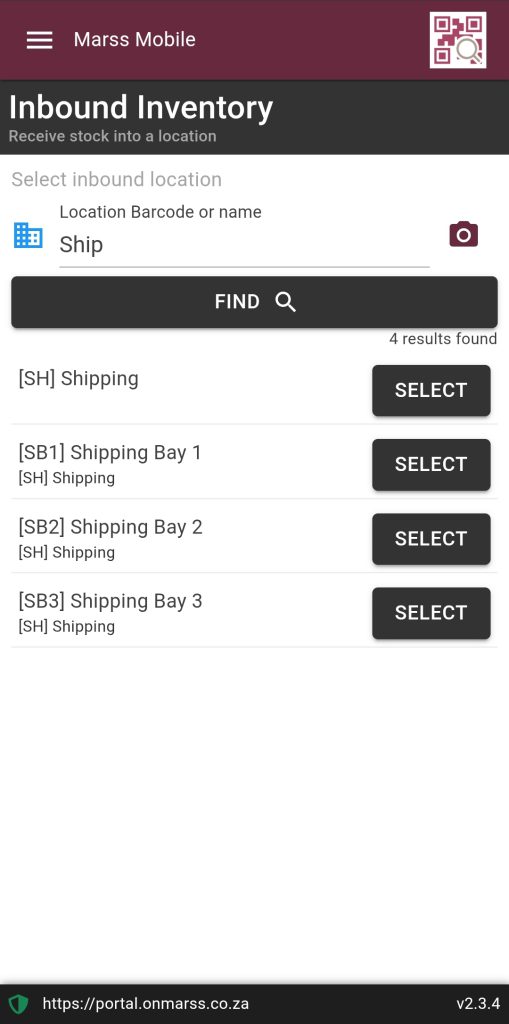
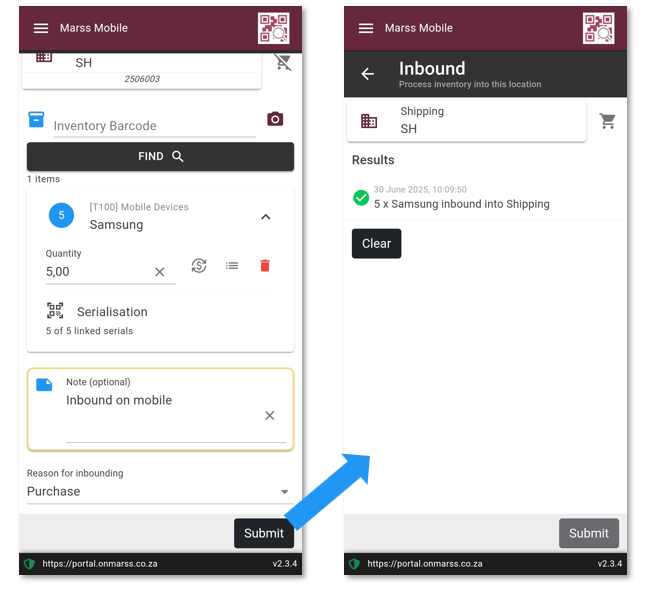
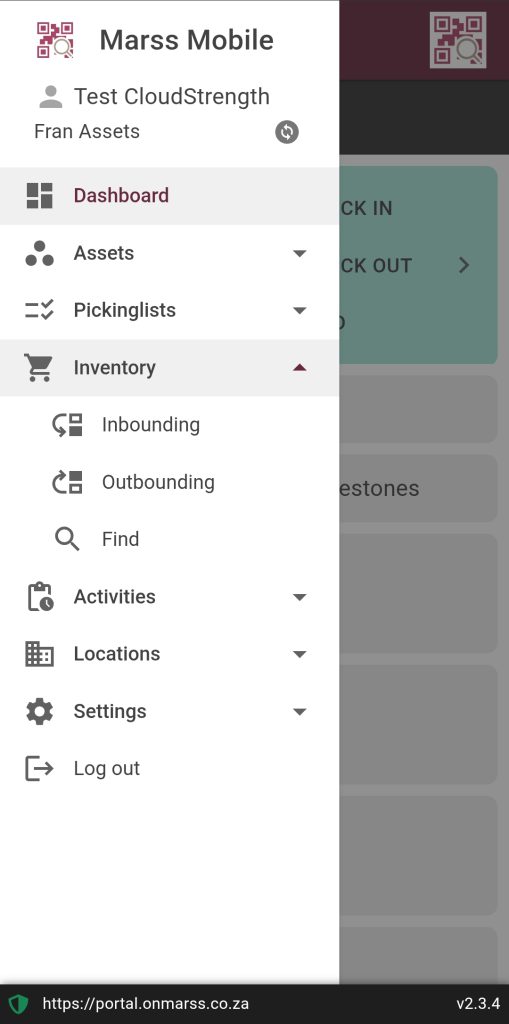
Open the Marss mobile app, login and navigate to Inbouding from the Inventory option in the menu (select the menu icon in the top left corner on the app).
- Select the location the stock will be inbound to by entering or scanning the location barcode, or by searching for the location by name and selecting the correct option

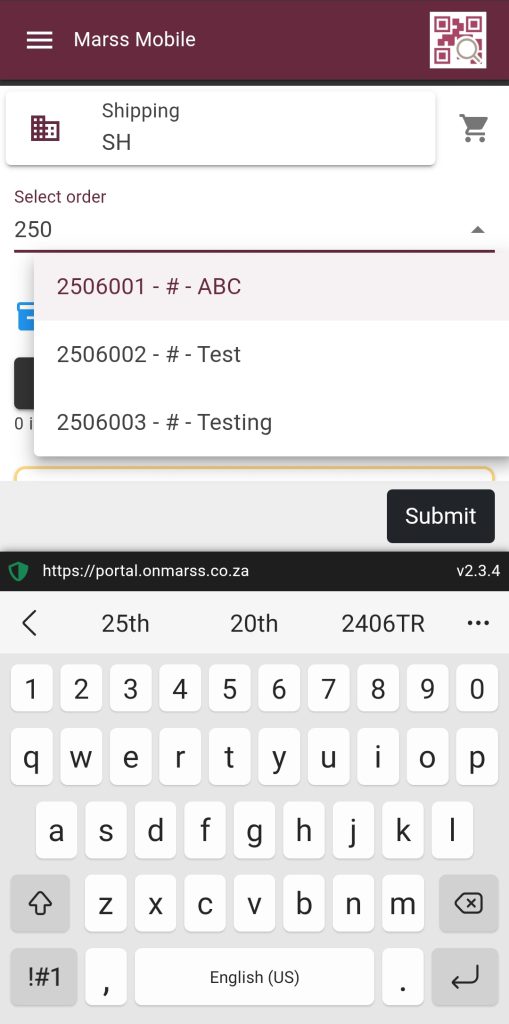
- If the inbound is related to an order, select the shopping cart icon in the top right corner to search and select the order
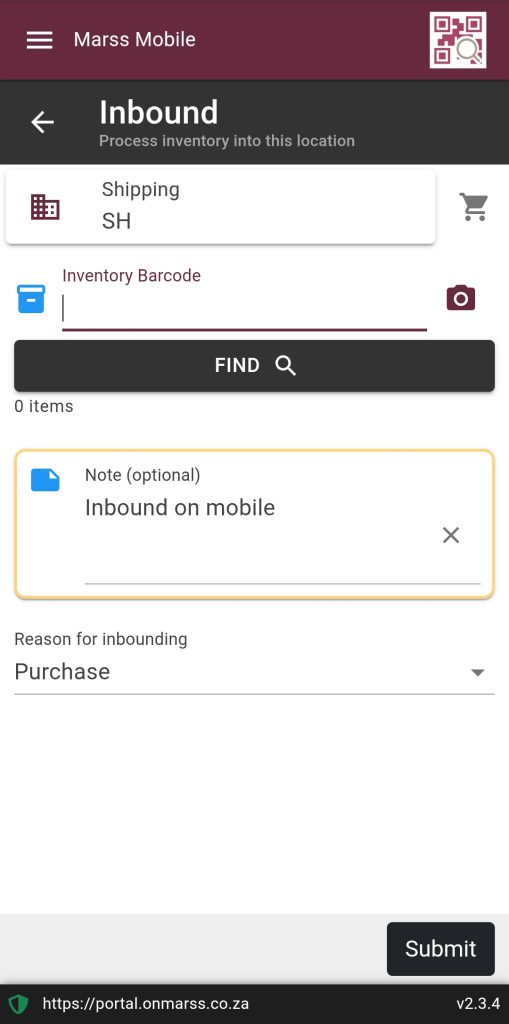
- Scan or enter the barcode number of the stock to inbound, once found a block will be displayed per scanned item
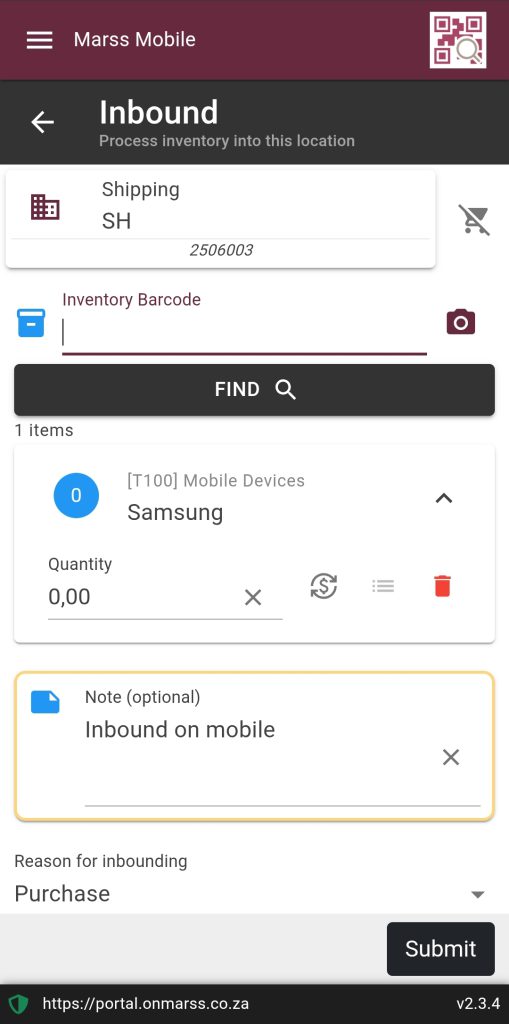
- Update the quantity
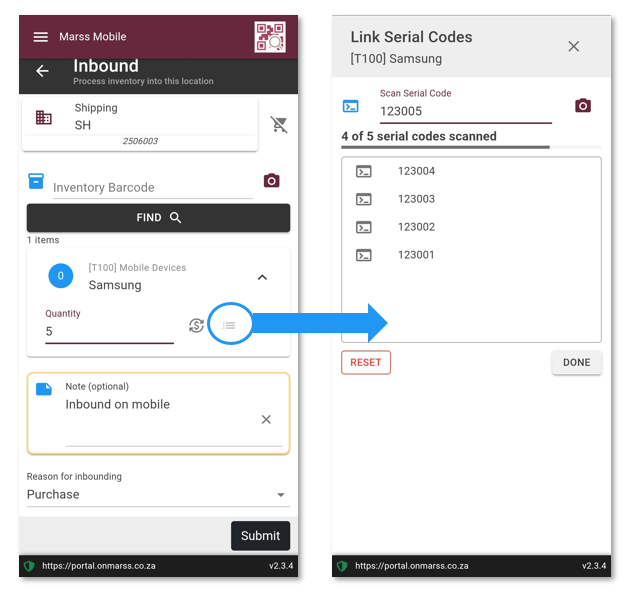
- Select the icon next to the stock value icon to scan the corresponding serial numbers. Scan or enter the serial numbers
- Once all the serial numbers are scanned select the Done button to return to the Inbound page
- Enter a note (optional)
- Update the reason for inbounding if necessary
- Select the Submit button
- Once successfully submitted the results will be displayed
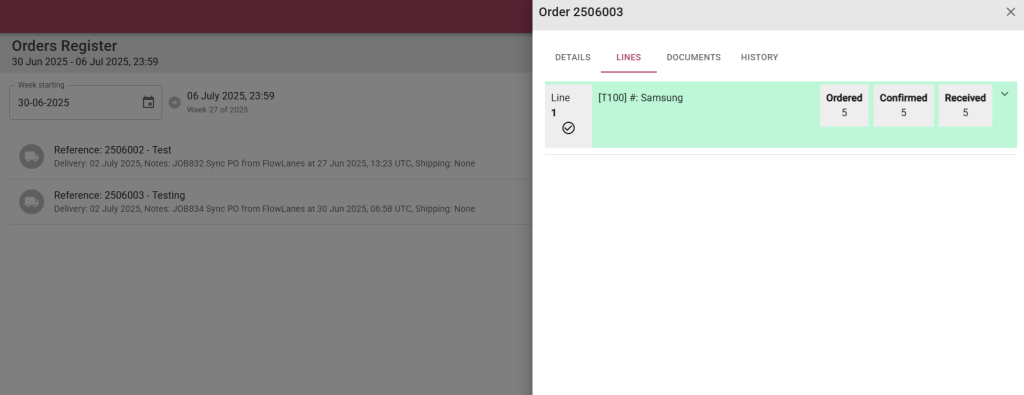
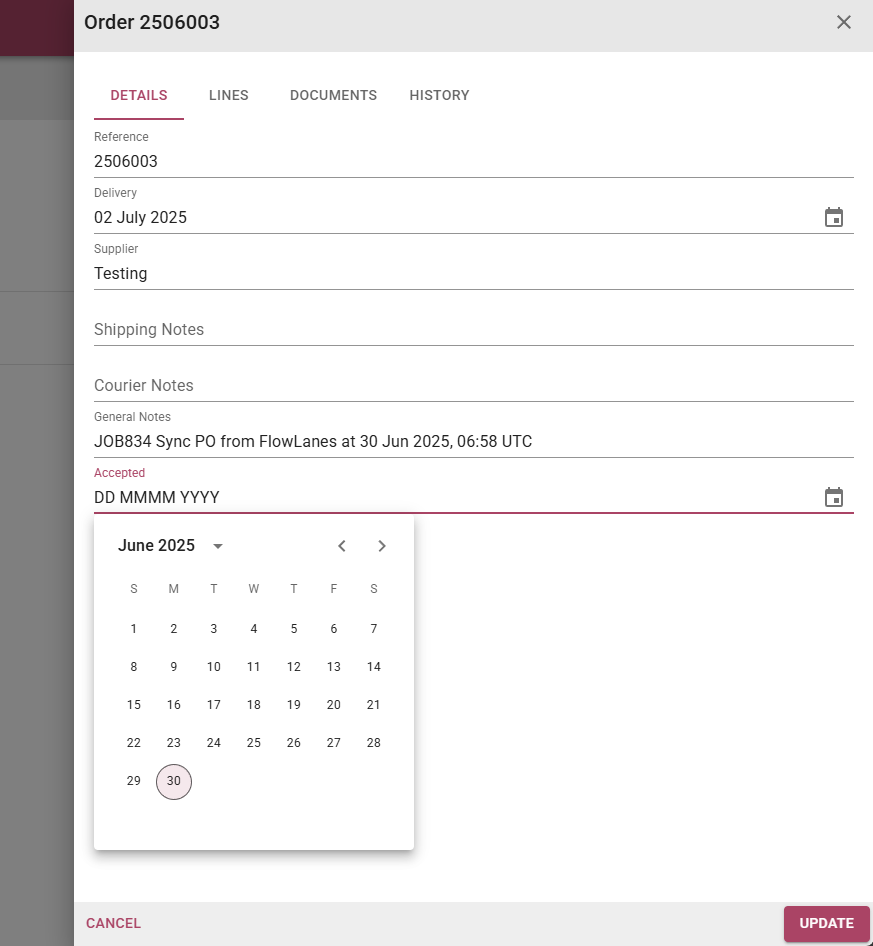
Navigate to the orders page on Marss to view the lines details and select the accepted date if all order lines are fulfilled:
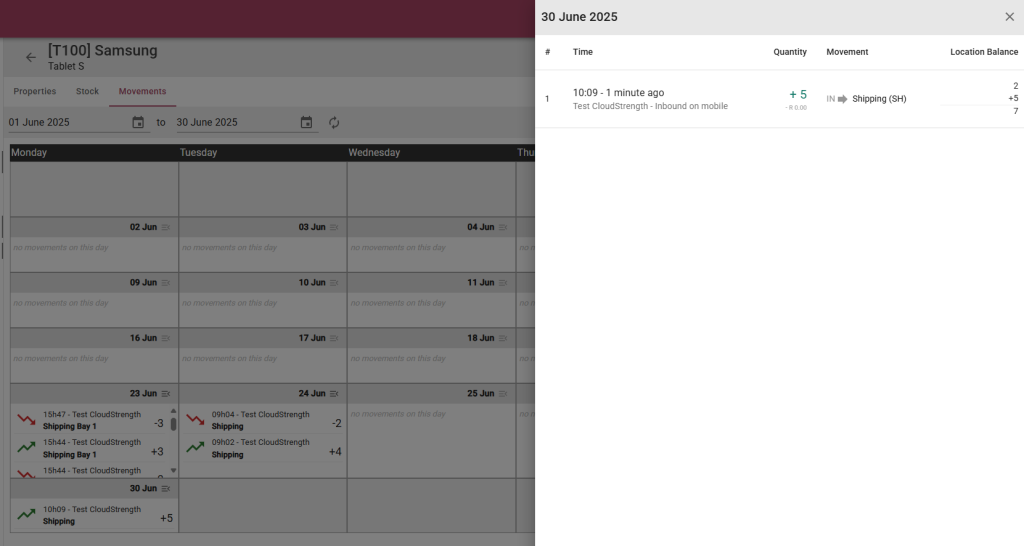
The stock levels can be viewed on the Inventory/Find page on Marss, select the movements tab to view the movement of stock for the selected inventory item:
The order’s status on the job will automatically update once the order is processed (accepted date saved):
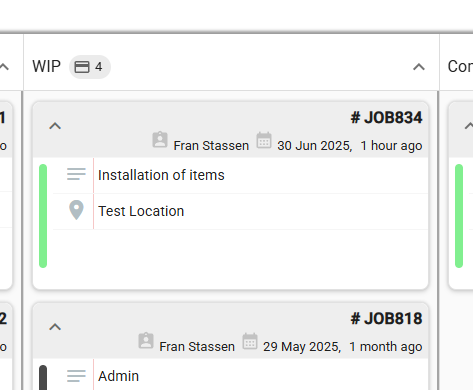
Step 5: Update the job status
- Now that there is enough stock to fulfil the job order, the job can move to the WIP lane (3rd lane), either select the WIP button on the job when the job is open, or click and drag the job card to the next lane
Step 6: Create the Picking List on FlowLanes and pick the stock on Marss Mobile
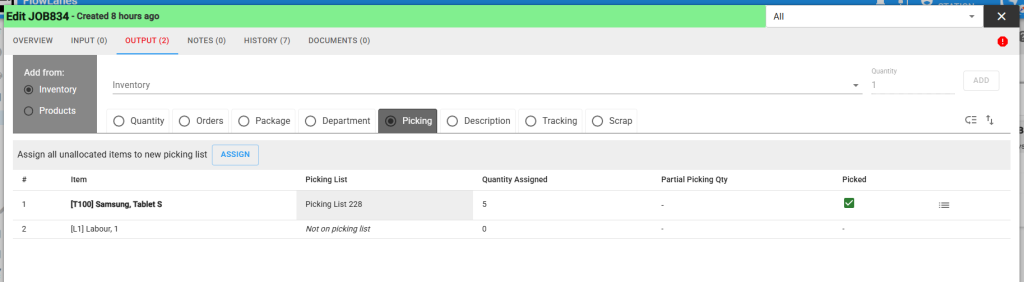
The inventory required for the job can now be picked and thereafter dispatched. To pick the stock from your store, open the job, select the Output tab and then select the picking toggle.
- The quantity entered in the estimate column will reflect on the picking list
- Update the quantity and save the job before creating the picking list if necessary
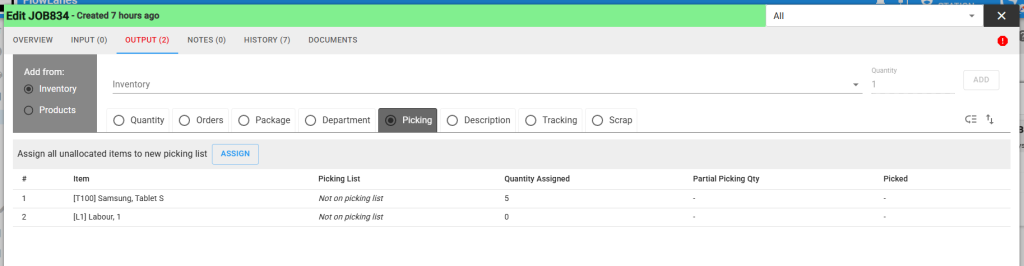
- Select the Assign button to assign the items to a picking list
- Once assigned a picking list number will be displayed
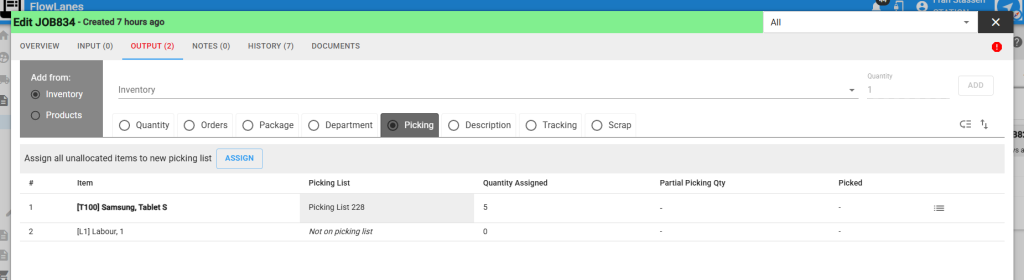
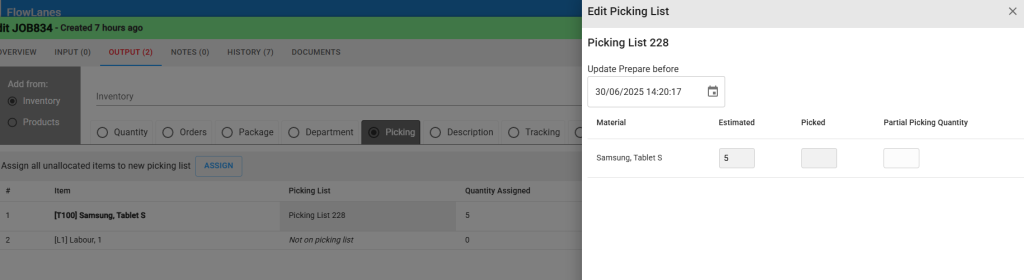
- Select the icon on the right side to see picking list details
The picking list can also be viewed on Marss, on the Logsitics/Picking List page:

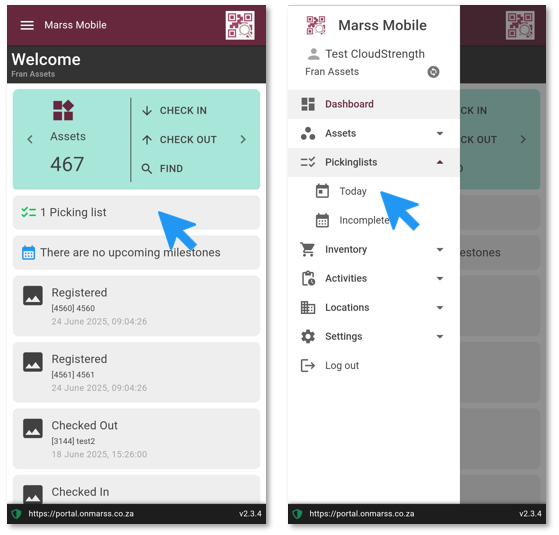
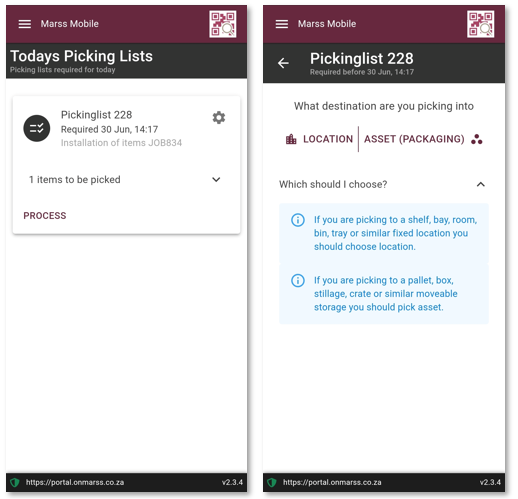
Open the Marss mobile app, you can select the shortcut on the home page to access the picking list, or to view picking lists to process today select the Today option from the Pickinglists menu, otherwise select the Incomplete option.
- Select the Process button to open the picking list
- Pick either to a location or into an asset (e.g. packaging or a container or stillage for transport):
- Scan or enter the inventory barcode
- Scan the location barcode or search the location where the items will be picked from
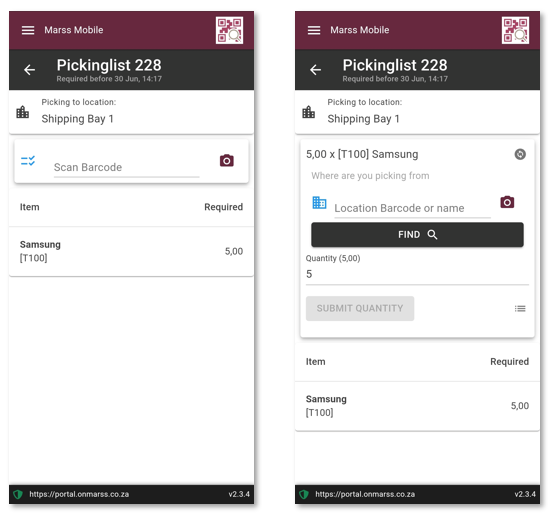
- Confirm the quantity
- Select the icon next to the stock value icon to scan the corresponding serial numbers. Scan or enter the serial numbers
- Once all the serial numbers are scanned select the Done button to return to the Picking page
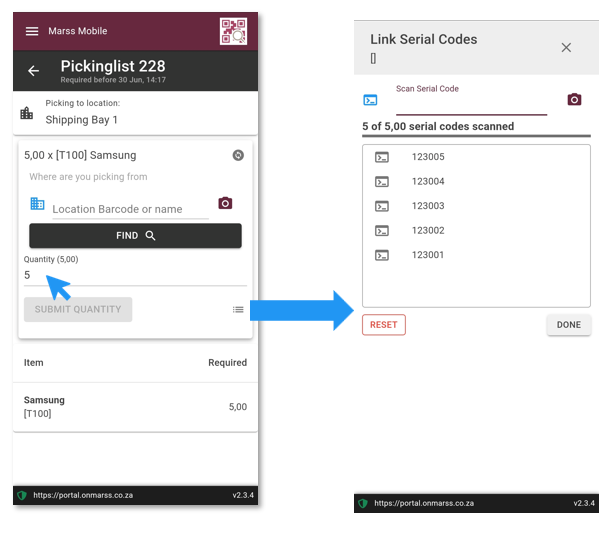
- Select the Submit Quantity button to complete the picking list
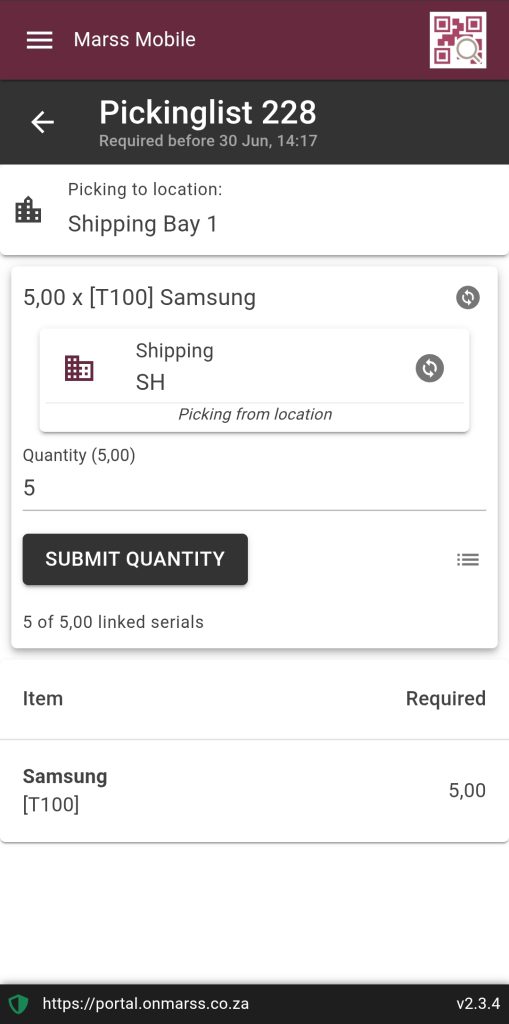
Once the items are successfully picked, the Picking toggle on the Output tab will automatically update:
Step 7: Outbound inventory and convert to assets
The items are now prepared and ready to be dispatched, outbound the inventory to reduce stock levels. During the outbound process, inventory can be converted into assets, with serial numbers designated as their unique identifiers in the form of asset barcodes.
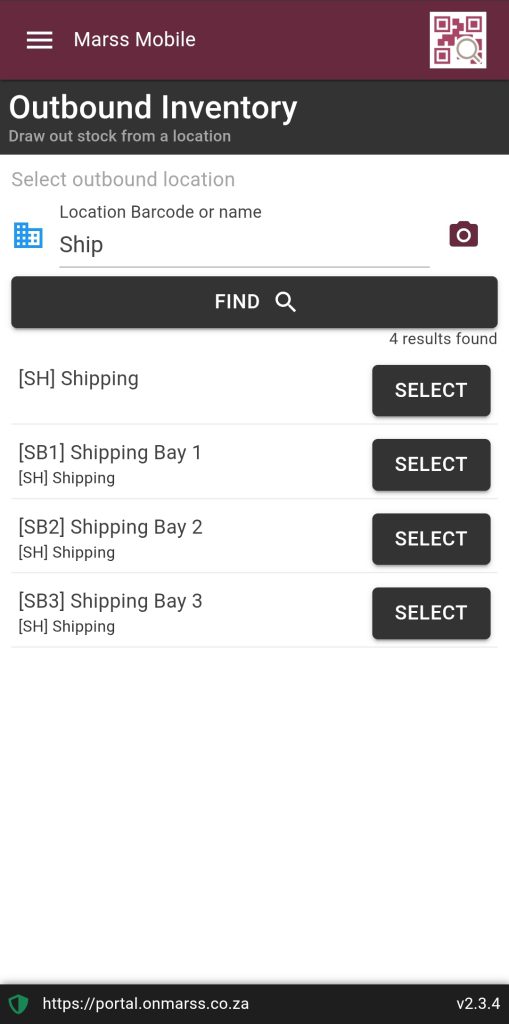
Open the Marss mobile app, login and navigate to Outbouding option from Inventory from the menu (select the menu icon in the top right corner on the app).
- Select the location the stock will be outbound from by entering or scanning the location barcode, or by searching for the location by name and selecting the correct option
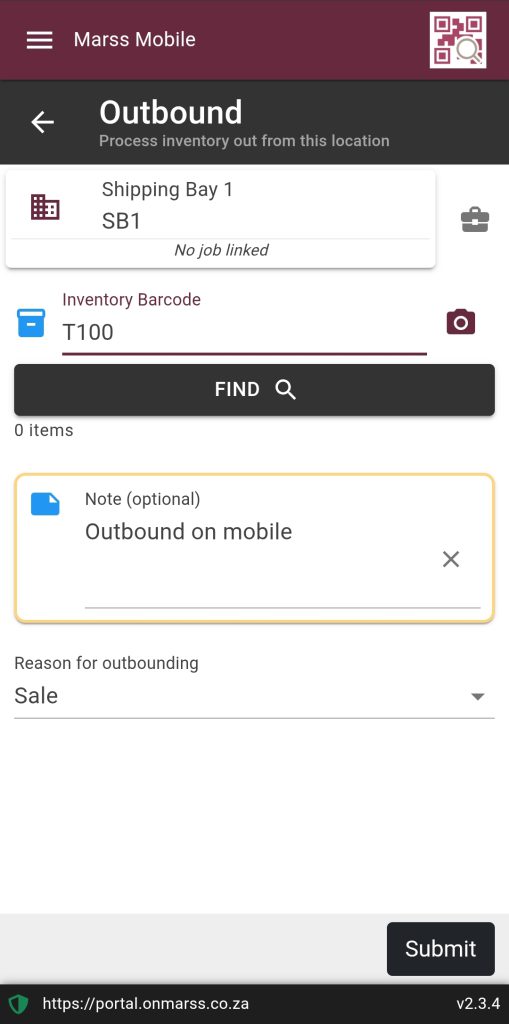
- Scan or enter the barcode of the inventory
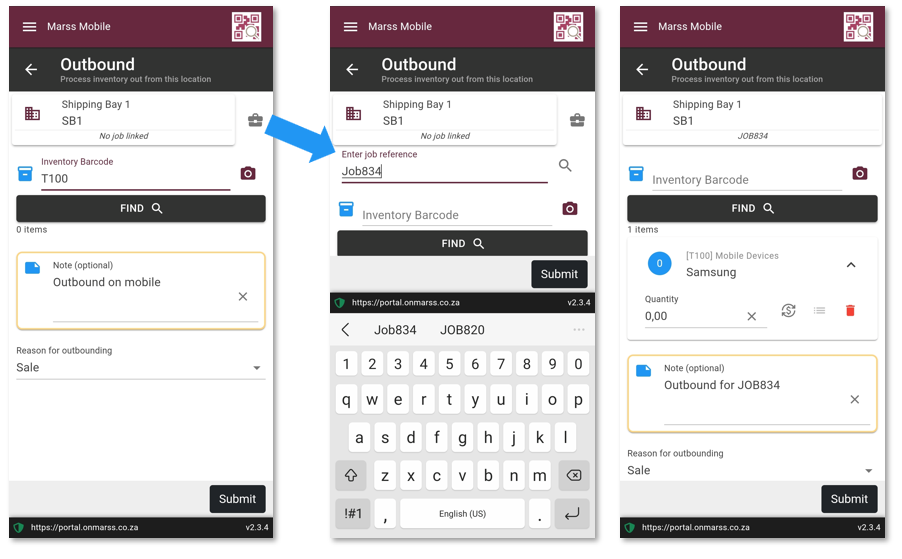
- Select the suitcase icon to link the job number, enter the job number and select the magnifying glass icon
- Once linked, the job number will be displayed below the outbounding location:
- Confirm the quantity
- Select the icon next to the stock value icon to scan the corresponding serial numbers. Scan or enter the serial numbers
- Once all the serial numbers are scanned select the Done button to return to the Outbound page
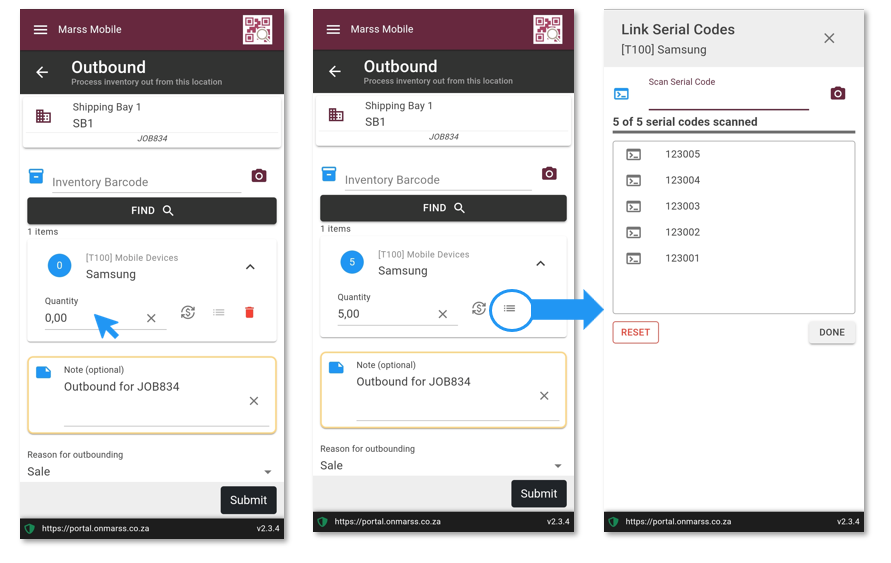
- Select the Track as assets check box if the scanned serial numbers should be converted to assets
- Confirm the note (optional) and reason for outbounding
- Select the Submit button. Once successfully submitted the results will be displayed:
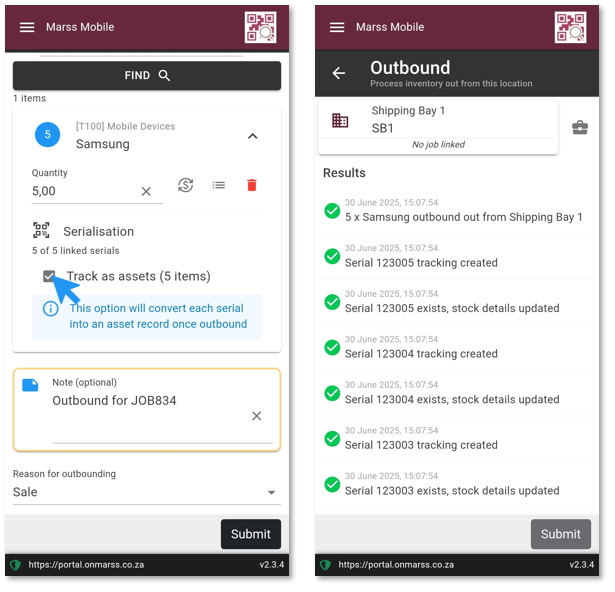
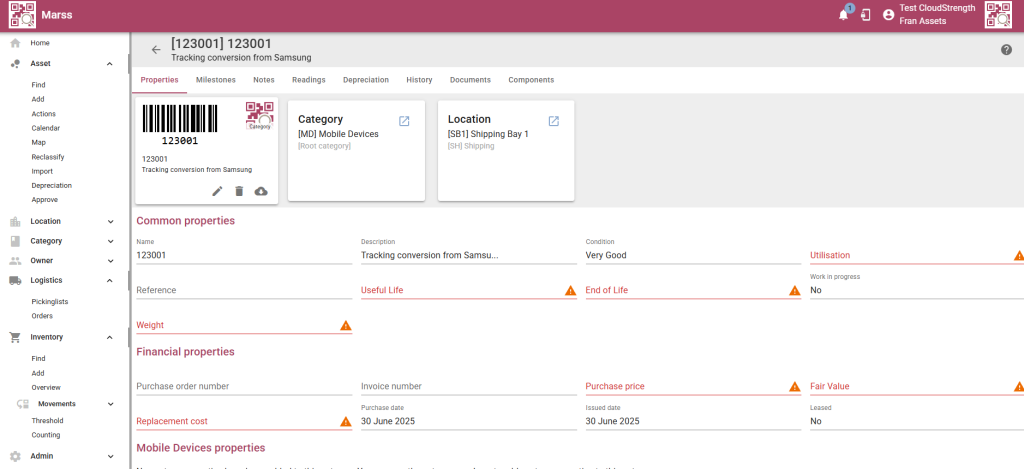
The new assets with the serial numbers set at the asset barcodes, can be viewed on Marss:
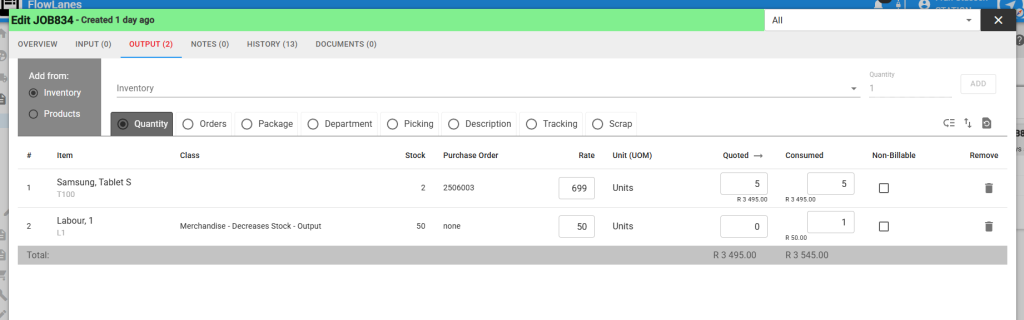
Step 8: Update the consumed column on the job
- Open the job and navigate to the Output tab
- Update the consumed values
- Save the job
Step 9: Complete the job and push to invoicing
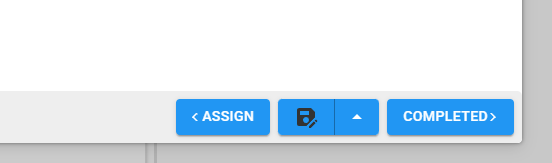
Update the job status, then push the job to the Billing page for invoicing, either select the Complete button on the job when the job is open, or click and drag the job card to the last lane
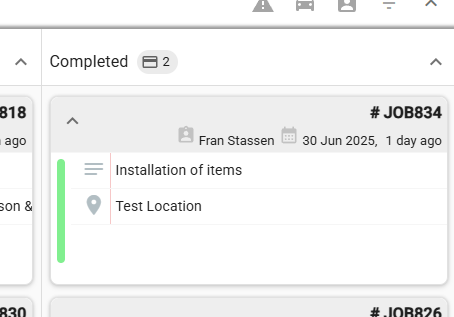
- Optional – Once the job is in the last lane, open the job and select the Invoice button (ensure a client is linked to the job):

If this step is skipped, the Archive button can be used to archive the job. Archived jobs will be hidden from the Job page, but can be viewed on the History page.
If pushed to invoicing, select the Billing from the Financial menu
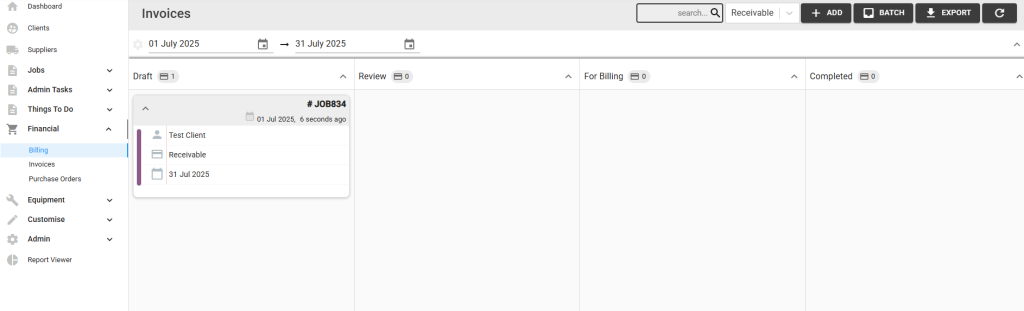
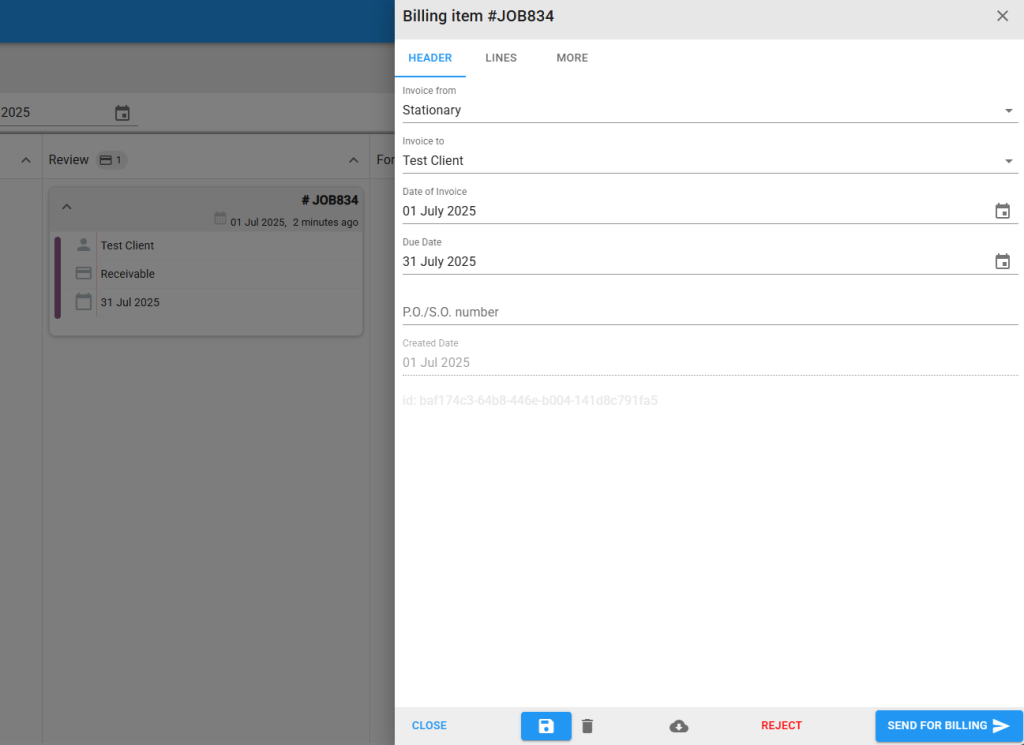
Update the invoice status by selecting the Send to Review button on the invoice when the invoice is open, or click and drag the invoice card to the next lane:

Once the invoice is approved during review, update the invoice status by selecting the Send for Billing button on the invoice when the invoice is open, or click and drag the invoice card to the next lane:
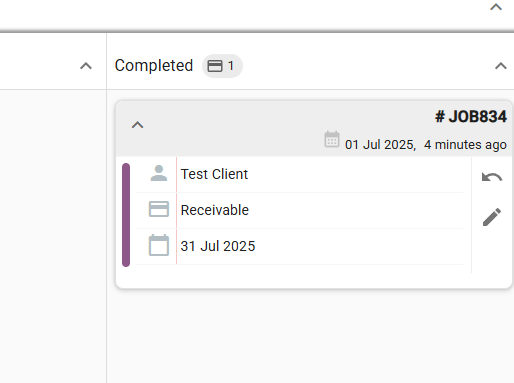
Once the billing is complete, update the invoice status by selecting the Approve button on the invoice when the invoice is open, or click and drag the invoice card to the last lane:
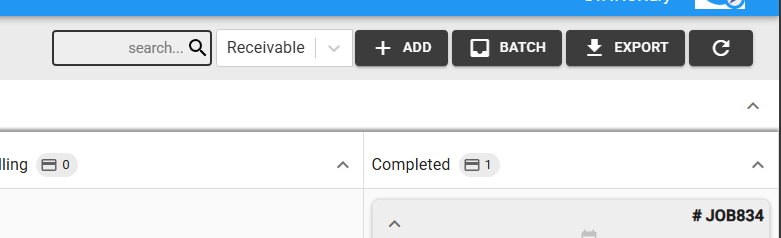
Completed jobs can be batched by selecting the Batch button in the top right corner:
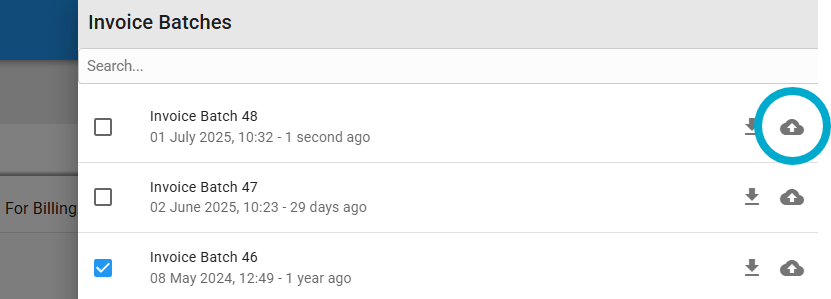
Once batched, the Export button in the top right corner can be selected, select the sync button to push the invoice to Xero:
Step 10 – Optional – Sync assets and inventory to Xero
Connect to Xero and Synchronise assets and inventory – See External Sync